
Have you ever wanted to make your own Playbill program for a local production or event? Whether you’re building a full professional program for a high school or community theatre show or just making a fun program for an especially theatrical wedding or birthday party, PLAYBILLDER makes creating authentic Broadway-quality Playbill programs easy and fast. Using the steps below, you’ll have your own custom Playbill program built and ready to print in no time flat.
Step 1: Register with PLAYBILLDER
If you haven’t created an account at PLAYBILLDER.com already, you’ll need to register first. We just need your name, email address, and a few other details and you’ll be ready to go.
Pro tip: If you’re not creating your program for a school or organization, just type “Personal” when asked for School or Organization Name.
Step 2: Create a production
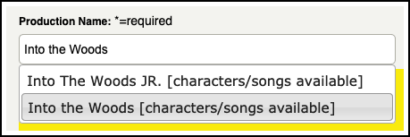
Enter the name of your production or event and the venue where it will be held. If performance dates and times aren’t solidified yet, don’t worry; you can fill in or change those fields later.
PLAYBILLDER Express pre-loads your program with songs, character names, and more.
Pro tip: The PLAYBILLDER Express library offers licensor-approved program information for thousands of the most popular shows, saving you from having to enter character names, song lists, and more. If a drop down appears as you’re typing in your production name, that means your show may be in our PLAYBILLDER Express library. Click the show title in the drop down to pre-load those templates into your program.

Step 3: Cover
After accepting our terms and conditions, you’ll be given the option to create a Save the Date or a Virtual Playbill. The Virtual Playbill can live online as a digital program, but is also how you create a printable program. Your online, digital program will match your printed program exactly, making PLAYBILLDER the perfect option for both traditional in-person performances and hybrid or streamed productions!
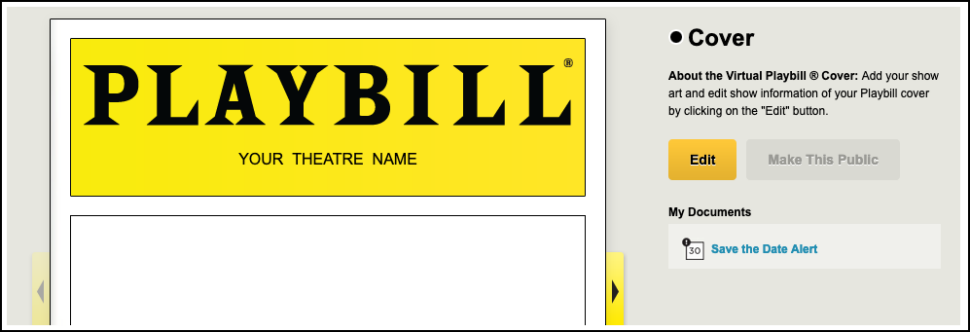
When you click “Create a Virtual Playbill,” you’ll be taken to the Program Creation Tool. Take a look at the toolbar. Here you’ll find every section available to you for building your program. As you begin work on the various sections, the lines beneath each section will change color. A gray line means no work has been done. A black line means work has been done, but it’s not published and ready to print or view online. A green line means the section has been published.

The toolbar lets you navigate to all of PLAYBILLDER's section templates.
Don’t have a use for a particular section? Skip it! Any non-published section will be absent from the online and printed version of your Playbill program. The only section you have to use is the Cover—you're making a Broadway-quality Playbill program, after all. You can also change the order of the sections. Click the yellow “Re-Order Sections” button and adjust as needed.
To begin customizing your cover, click the yellow “Edit” button to enter edit mode. Let’s start with the yellow header. A toolbar allows you to style your text with bold, italics, and underline options; left, center, and right alignment; and a number of fonts—you’ll find this familiar toolbar throughout the PLAYBILLDER sections. Broadway Playbill programs generally use this header space for the venue name, though many PLAYBILLDER customers include additional information here, such as performance dates.
Pro tip: If you’re going for a Broadway-authentic look, change the font to Arial, the text size to 16px, and the alignment to center. Leaving a blank line above the text, type the venue name in all caps with two spaces between each word.
Next is the cover artwork, which is beneath the header. Clicking the pencil icon in the upper left-hand corner of this area will bring up the image upload tool. Once you’ve uploaded an image, use the crop tool if necessary to make the image fit perfectly.
Pro tip: Images should be in JPG format, and less than 10mb.
Step 4: Billing
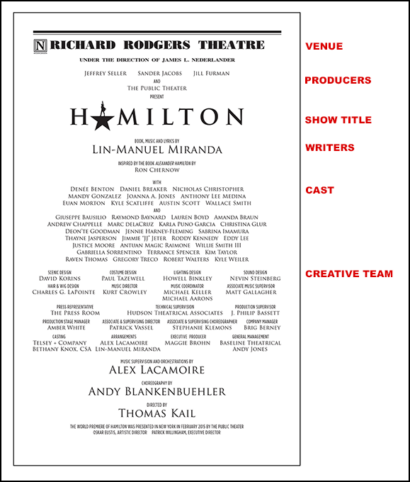
Think of this section like your program’s title page. A Broadway program’s billing page usually begins with the venue name and producers at the top, followed by the show’s title, writers, cast, and creative team. Your program is fully custom, so you can include as much or as little of that as you wish.
Using our billing page template is pretty similar to using any word processor, such as Microsoft Word or Google Docs. The table tool—which looks like a grid—is a great way to create columns of text.
Pro tip: If you’re unsure what to make your billing page look like, head over to Playbill Vault. If your show has played Broadway, its opening night Playbill program is available to look at online.
Step 5: Songs
The Songs template has the ability to include acts, overtures, scenes, and songs. Most song listings use only acts and songs, but scenes allow you to structure the song list further if desired. You can also hide the act headers if you want to limit the list to only songs.
Pro tip: If after adding all of your songs you’ve got extra white space at the bottom of the page, the Optional Filler Content section at the bottom of the edit screen allows you to add text and images to fill space. Several PLAYBILLDER sections include this option.
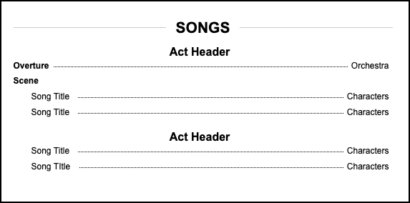
A view of how PLAYBILLDER arranges acts, overtures, scenes, and songs in the Songs template.
Step 6: Cast and Crew Lists and Who’s Whos
The Cast section offers various headings: Cast Members, Production / Creative, Understudies, and Orchestra. These headings are fully customizable; click any of the headings to change their text. Don’t want to use multiple headings? Any header without content added beneath it will not appear in the finished program.
Creating the cast list is as easy as typing in the character name and the name of the actor playing the role. You can even use the “Add in Bulk” option to add an entire ensemble on one line or paragraph. The crew section works similarly, but without the option for multiple headings.
Adding cast and crew members in these sections also automatically generates an accompanying listing on the cast and crew Who’s Who sections, which is where you can add an actor’s headshot and bio.
Bios are limited to 375 characters. If more room is required, you can extend a bio and increase the character count to 975, but this reduces the number of bios that will fit on a page. We recommend limiting the use of extended bios as much as possible.
Pro tip: All of the section headers at the very top of each page are customizable by clicking the header while in edit mode.
Step 7: Photos, Ads, and Back Page
There are three sections in PLAYBILLDER meant for including pictures: Photos, Ads, and Back Page. All three use photo upload tools that are similar to the cover and headshot upload tools.
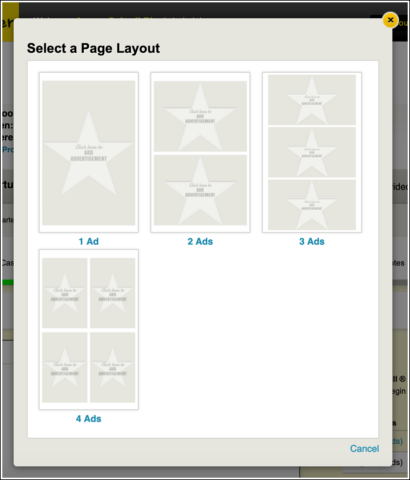
The Photos and Ads sections will allow you to create pages of four 1/4 page photos, two 1/2 page photos, or one full page photo. After creating your first page, you can create additional photo or ad pages by clicking “Add a New Photos/Ads Page” on the right.
The Back Page section is exactly like a full page Ad, but it will appear on the program’s back cover.
Pro tip: Selling ad space in your program helps defray production costs while also getting community business leaders involved and invested in the success of your production. Read more here.
Step 8: Acknowledgments, End Notes, and Optional Content
These sections are the most open ended of PLAYBILLDER’s templates. If you want to include a director’s note, special thanks, or any other kind of extra content, these are the sections to use.
Pro tip: You can also use End Notes as your back page. Leave the Back Page section blank, and your End Notes—or whatever published section you have placed last—will become your program’s back page.

Step 9: Count Your Pages
At the top of the Program Creation Tool, you will see a count of your total printable pages. To make a finished program, your total page count needs to be a multiple of 4. If you’re having trouble making that happen, photo pages are an easy way to increase your page count.
Remember: Only sections with green lines are being included in this page count.
Pro tip: Our system will automatically add blank autograph pages if you try to submit a print order for a program whose pages are not a multiple of four. If you're okay with those, don't worry about your page count at all!

Step 10: Print!
There are two ways to print your custom Playbill program. The easiest is to use our professional print service. Click the yellow “Print Custom Playbills” button and place an order. You’ll receive your programs, professionally printed and bound, at your front door. You can also have 14x22” posters printed of your program’s cover.
Pro tip: The Playbill Store offers custom-made frames for PLAYBILLDER-created programs and posters.
If you’d like to print your program on your own or using a local printing service, click “Enable PDF” in the upper right-hand corner of the edit area. For a one-time $70 license fee, you get unlimited downloads of a printable PDF version of your program. No additional payment is required if you generate new PDFs after making edits.
Pro tip: If you pay the PDF license fee and then choose to use our professional printing services, you will receive a $70 credit that can be applied towards the cost of your print job. Many of our customers purchase a PDF license so that they can print proofreading copies prior to submitting print orders, or for more open-ended digital distribution.
Ready to get started? Visit PLAYBILLDER.com!
Need More Help? PLAYBILLDER support staff is always standing by to help if you need assistance. Call our live help desk, staffed weekdays 9 AM to 3 PM ET, at 212-557-5757 (ext 167), or email [email protected].


